JavaScript
FVA-Workbench scripts are written in the JavaScript (JS) programming language. Outside of the FVA-Workbench, JS is primarily used for programming dynamic internet websites. The JS language core is called ECMAScript and includes the JS functions, which can be used for both websites and the FVA-Workbench.
Note
The range of JavaScript functions is too large to be presented in the KnowledgeBase. The following section only deals with the most important language elements. There are many internet sites that provide answers to every conceivable JS problem. All JS functions that are not specifically intended for the manipulation of web pages can also be used for scripting in the FVA-Workbench.
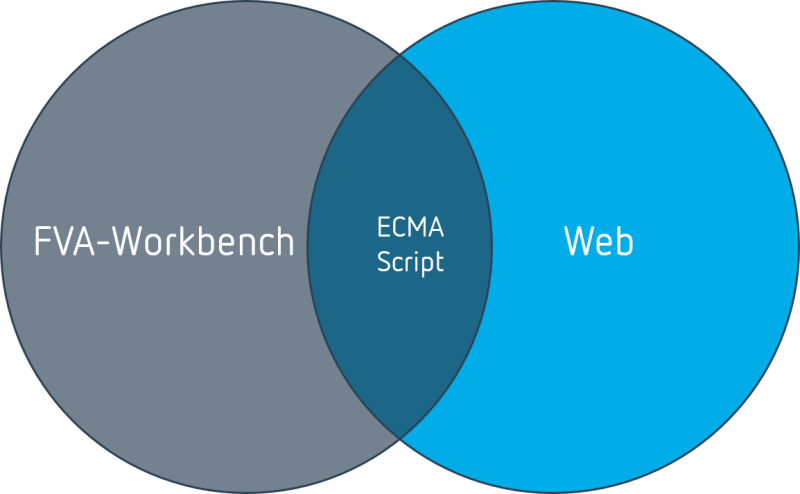
Thanks to the common language core, the majority of the JS features that are used for websites can also be used in the FVA-Workbench.
Data types
User inputs and calculation results are stored in attributes with the following data types:
Data type | Type identifier | Data | Example attribute (ID) |
|---|---|---|---|
Logical value | Boolean | true or false | use_fem_part (Consider FEM stiffness) |
Number | Double | 3.14159 | iso 6336 application factor (application factor) |
Number with unit | TechValue | 3.14159 mm | center_distance (center distance) |
Character string | String | "This is text" | comp_remarks (component notes) |
List | Array | [0.12, 2.34, 7.83, 2.33] | force in mesh direction (load distribution across the face width ) |
List of lists | Matrix | [ [1.2, 3.0, 4.6], [0.2, 6.4, 2.1], [3.1, 1.5, 9.5] ] | result_matrix_pressure_distribution_values (pressure distribution) |
Special case: combo attributes
The FVA-Workbench input editor includes many drop-down lists, where the user can select from several options. This selection is stored in so-called combo attributes. These combo attributes can be either string, integer, or double data types.

"Allocation of addendum modification" combo attribute in the FVA-Workbench editor.
For combo attributes, an internal value list is stored, in which each option is assigned to exactly one value.
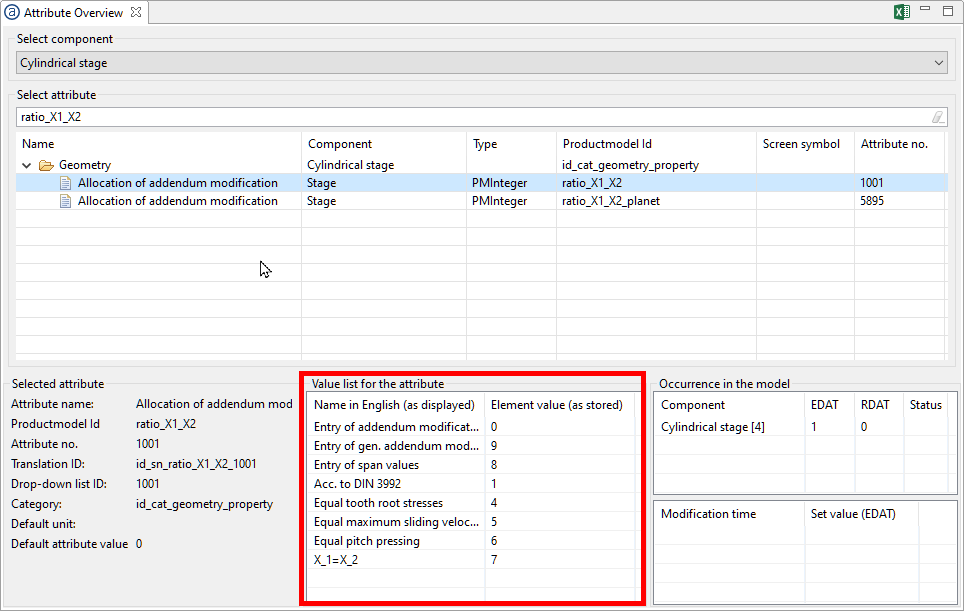
The attribute overview explains the value which corresponds to each selection.
setAttr("ratio_X1_X2", stageID, 6, EDAT);Example script: sets "Allocation of addendum modification" combo attribute to a value of 6 for "uniform rolling contact pressure."
Variable validity range
The validity range describes where a variable is available and can be used within a script.
JS variables are either global or local. Global variables are declared using the keyword var. var myVariable = 3.14 Global variables can be accessed from anywhere in the script. However, this can quickly lead to errors, as variables can be assigned more than once or overwritten.
Local variables are declared using the keyword let. let myVariable = 3.14 Local variables can only be accessed within the current code block.
Tip
To minimize the potential for errors, in most cases variables should be declared with the keyword let.
Example - declaring a global variable
 1for(var i=0; i<10; i++){
 2println(i);
    }
for loop which defines the counting variable i as a global variable using var. | |
As i is declared as a global variable, 10 is displayed on the Scripting Monitor. |
Example - declaring a local variable
1for(let i=0; i<10; i++){
2println(i);
   }
Mathematical functions
JS offers a number of mathematical functions that can be used in scripting in the FVA-Workbench:
Function | Return value |
|---|---|
Math.abs(a) | Positive value of a |
Math.ceil(a) | Next-higher whole integer of a |
Math.floor(a) | Next-lower whole integer of a |
Math.round(a) | Rounded whole integer |
Math.max(a,b) | Greater of two numbers a, b |
Math.min(a,b) | Lesser of two numbers a, b |
Math.max.apply(null, array) | Greatest number in an array |
Math.min.apply(null, array) | Smallest number in an array |
Math.random() | Random number between 0 and 1 |
Math.exp(a) | Exponential value of a |
Math.pow(a,b) | Number a to the power of b |
Math.log(a) | Application of the natural logarithm to a |
Math.sqrt(a) | Square root of a |
Math.sin(a) | Sine of a |
Math.cos(a) | Cosine of a |
Math.tan(a) | Tangent of a |
Math.asin(a) | Arc sine of a |
Math.acos(a) | Arc cosine of a |
Math.atan(a) | Arc tangent of a |
Operators
Comparison operators are used in logic statements to determine whether variables or values are equal or different. Logical operators are used to logically link two or more conditions together.
Example - if statement condition using comparison and logic operators
let age = 17;
let country = "germany";

if(age >= 16 && country == "germany"){
   println("You are allowed to drink beer");
}Operator | Description | Example (x = 3) | Return value |
|---|---|---|---|
== | equal | x == 2 | false |
!= | not equal | x != 4 | true |
> | greater than | x < 4 | true |
< | less than | x > 4 | false |
>= | greater than or equal to | x >= 3 | true |
<= | less than or equal to | x <= 4 | false |
Operator | Description |
|---|---|
&& | With the "and" operator, both or all conditions must be met for the entire condition to be true. |
|| | With the "or" operator, only one of the conditions must be met for the entire condition to be true. |
! | The "not" operator is true if the expression is false. |
for loops
The header of a for loop includes a counting variable, a continuation condition, and an instruction for changing the counting variable.
Example - increase the torque for a load component from 0 to 100 in increments of 10, and run a system calculation after each increase.
let gearUnitID = 1;
let forceID = 20;
for (let i = 0; i <= 100; i+=10){
    setAttr("scaled torque", forceID, i, EDAT);
    runCalcMethod("001_SYSTEM_CALCULATION", gearUnitID);
}
Example - display the name of each rolling bearing in the model on the Scripting Monitor.
let bearings = getCompByType("bearing");
for (let i = 0; i < bearings.length; i++){
    println(getCompProperty(bearings[i], "NAME"));
}
while loops
while loops
While loops repeat instructions as long as the condition at the beginning of the loop is true. If the condition is not true for the first query, the while loop is not executed at all.
var i = 0;
while (i < 10) {
   println(i);
   i = i+1;
}
do-while loops
In contrast to while loops, the loop condition is first checked at the end of the loop. Therefore, the loop is executed at least once.
var i = 0;
do {
   println(i);
   i = i+1
}while (i < 10);
forEach loops
The forEach loop executes an instruction for each element in an array.
Example - multiply each value in an array by 3 and output to the Scripting Monitor.
let array = [2, 4, 5];
array.forEach(function(element){
    println(element * 3);
});
Example - set the input value (EDAT) for ISO 6336 application factor for all cylindrical gear stages to 1.5.
let cylindricalStages = getCompByType("cylindrical_mesh");

cylindricalStages.forEach(function(element) {
    setAttr("iso 6336 application factor", element, 1.5, EDAT);
});
if/else statements
An if statement executes an instruction when a condition becomes true. If the condition is false, a different command can be executed using an else statement.
Example - Query the safety against fatigue fracture of a notch and execute different instructions depending on the value.
1let gearUnitID = 1;
2let notchID = 64;

3setAttr("gta_switch_iso_6336_2006", gearUnitID, true, EDAT);
4runCalcMethod("001_SYSTEM_CALCULATION", gearUnitID);
5let safety_SD = getAttr("safety_factor_S_D", notchID, RDAT);

6if (safety_SD >= 1.2){
    alert("Success SD = "+safety_SD);
7}else{
    alert("Failure SD = "+safety_SD);
    }
Component ID of the gear unit. | |
Component ID of a notch. | |
Sets system switch for "Shaft safety acc. to DIN 743" to true. | |
Executes a system calculation. | |
Assigns the calculated safety value (RDAT) to the safety_SD variable. | |
If safety_SD >= 1.2, display "success" and output the safety value in the message window. | |
Otherwise, display "failure" and output the safety value to the message window. |
switch statements
The switch statement is used to execute different actions based on various conditions. The break keyword terminates the switch statement and the corresponding value is returned. The default keyword defines the instruction that is executed if none of the values match.
Example - set different face modification values depending on the module
1let gearID = 30;
2let modificationID = 51;
3let module = getAttr("normal module", gearID, EDAT);
4let amount = 0;
5switch (module) {
6    case 1:    amount = 3; break;
        case 1.5:  amount = 3; break;
        case 2:    amount = 5; break;
        case 2.5:  amount = 8; break;
        case 3:    amount = 10; break;
        case 4:    amount = 12; break;
        case 5:    amount = 15; break;
        case 6:    amount = 15; break;
        case 7:    amount = 15; break;
        case 8:    amount = 20; break;
        case 10:   amount = 25; break;
7    default:   alert("No modification amount defined for this module"); break;
  }
8println("Modification Amount: "+amount+" mym");
9setAttr("sekor_cb_bet", modificationID, amount, EDAT);
Component ID of a cylindrical gear. | |
Component ID of a modification component on the above cylindrical gear. | |
Assigns the variable module with the input value (EDAT) for the "normal module" attribute on cylindrical gear 30. | |
Declares the variable amount and sets it to 0. | |
Switch statement that uses the module as a comparison value. | |
If module = 1 the variable amount is set to 3. | |
If none of the above cases apply, a warning is displayed in the message window. | |
Outputs the selected correction amount on the Scripting Monitor. | |
Sets the input value (EDAT) of the "amount of crowning" attribute to the amount value. |
try-catch statements
If an error (exception) occurs during the execution of a script, the script is terminated and the exception is displayed on the Scripting Monitor.

An exception on the FVA-Workbench Scripting Monitor
Try-catch statements can be used to catch errors that occur while the script is running, react to them, and if possible to continue to execute the script despite the error.
To do this, the command in which an exception may occur is framed by a try statement. If an exception occurs, the command in the catch statement is executed.
Example
In the try statement, an attempt is made to execute a calculation. The parameters for the runCalcMethod() are the calculation method and the ID of the component to be calculated. Now, multiple errors can occur during the runtime. The method ID or the component ID may not exist, or the selected combination of the two cannot be calculated. The exception is caught in the catch statement and a message is displayed. The script then continues to run.
try {
   runCalcMethod(methodID, compID);
}
catch (e) {
    println("Error in the calculation of the component "+compID+" with calculation method "+methodID);
}
println("Script is continued");
Arrays
Arrays are data structures in which multiple values can be saved in one variable. The element index in brackets controls the access. The index starts at 0.
let array = [element0, element1, element2];
array[2] returns the third element in the list.
The length, or number of elements, can be queried with the .length method.
array.length returns 3.
Additional elements can be added to the end of the array using the array .push(newElement); method.
In the FVA-Workbench, arrays can contain numbers, strings, and components.
Example - accessing arrays
let array = [2, 4, 5];
let result = array[0] + array[2];
println(result);
In this example, adding 2 elements to an array results in 7.
Example - querying the array length
let numbers = [1, 2, 3, 4, 5];

for (var i = 0; i < numbers.length; i++) {
   numbers[i] = numbers[i]*2;
}
println(numbers);
The for loop will run as often as the number of elements in the array. Each time, the current element is overwritten with the value of the element * 2. When the loop is finished, the array contains the following elements: [2, 4, 6, 8, 10]
Example - adding elements to an array
let carmakers = ["BMW", "Mercedes", "Audi", "Edsel"];
carmakers.push("VW");
println(carmakers);
An additional element, "VW" is added to the "carmakers" array via .push. ["BMW", "Mercedes", "Audi", "Edsel", "VW"]
Example - saving FVA-Workbench components in arrays
let bearings = getCompByType("bearing");

for (i=0; i < bearings.length; i++){
    let catalog_name = getAttr("name", bearings[i], EDAT);
    println(catalog_name);
}
The getCompByType() function returns an array with all components of a type (here, rolling bearings). The for loop queries the "catalog name" attribute for each element (bearing) of the array and displays it on the Scripting Monitor.
Formatting and joining text
The inline statements tab \t and line break \n are available for simple text formatting. The format() function can be used for further text formatting. Multiple strings of text (strings) can be joined together using the + operator.
Figure 30. Line break 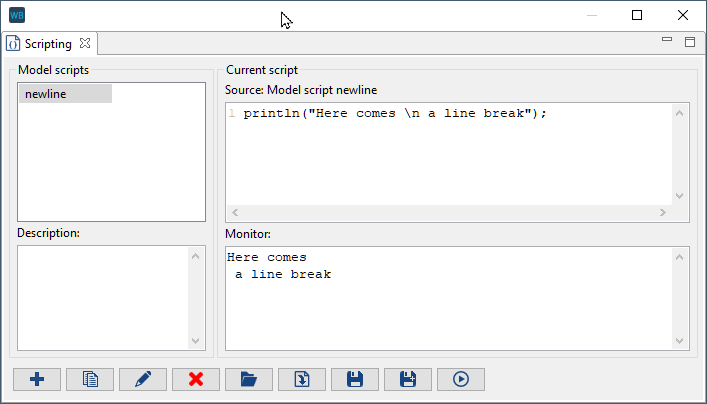 A line break can be created using | Figure 31. Tab 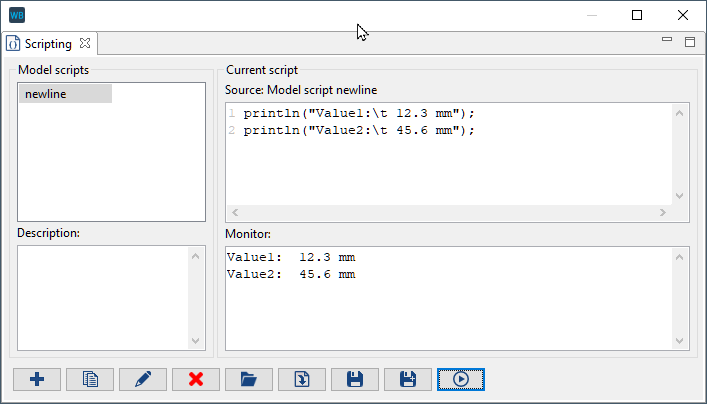
|
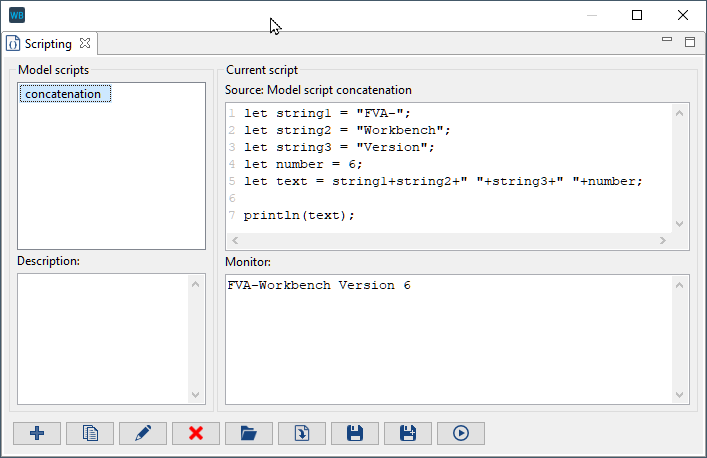
Multiple strings as well as numerical values can be linked together into a long string.
Outputting the date and time
The current year, month, day, hour, minute, second, and milliseconds can be output using the Date JS object. Initialize a variable with new Date(); to query the date. The query is then performed using point notation on this variable.
Example - Outputting the complete date and the current month on the Scripting Monitor
var today = new Date();
println(today);
println(today.getMonth());
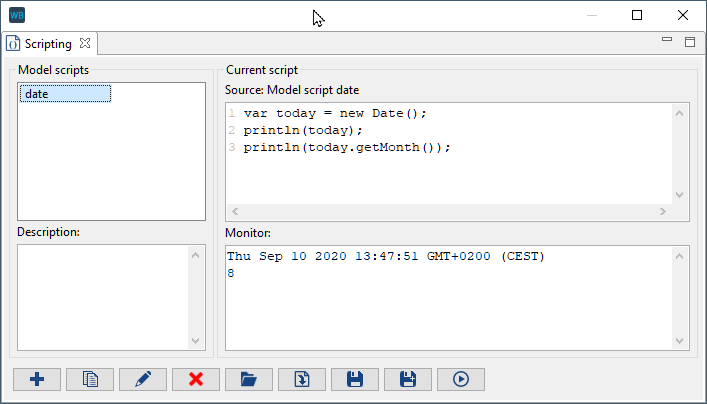
today | Thu Sep 10 2020 14:00:13 GMT+0200 (CEST) | |
|---|---|---|
today.getMonth(); | 8 | returns 0 - 11 |
today.getFullYear(); | 2020 | YYYY |
today.getDate(); | 10 | returns 1 - 31 |
today.getDay(); | 4 | Day of the week (starts on Sunday with 0) |
today.getHours(); | 14 | returns 0 - 23 |
today.getMinutes(); | 0 | returns 0 - 59 |
today.getTime(); | 1599739254412 | Milliseconds since 1.1.1970 |
Comments
In JS, comments can be used to clarify code and make it easier to read. It can also be used to temporarily comment out sections of code, for example to try alternative code.
1//Comments can be used to explain the code
    /*
2  Code between /* and */ is not executed
    */