Examples
Variation: helix angle and transmission error
The following script increases the helix angle of a cylindrical gear by 1° in each step, runs a system calculation including gear mesh excitation, and outputs the maximum transmission error to the Scripting Monitor.
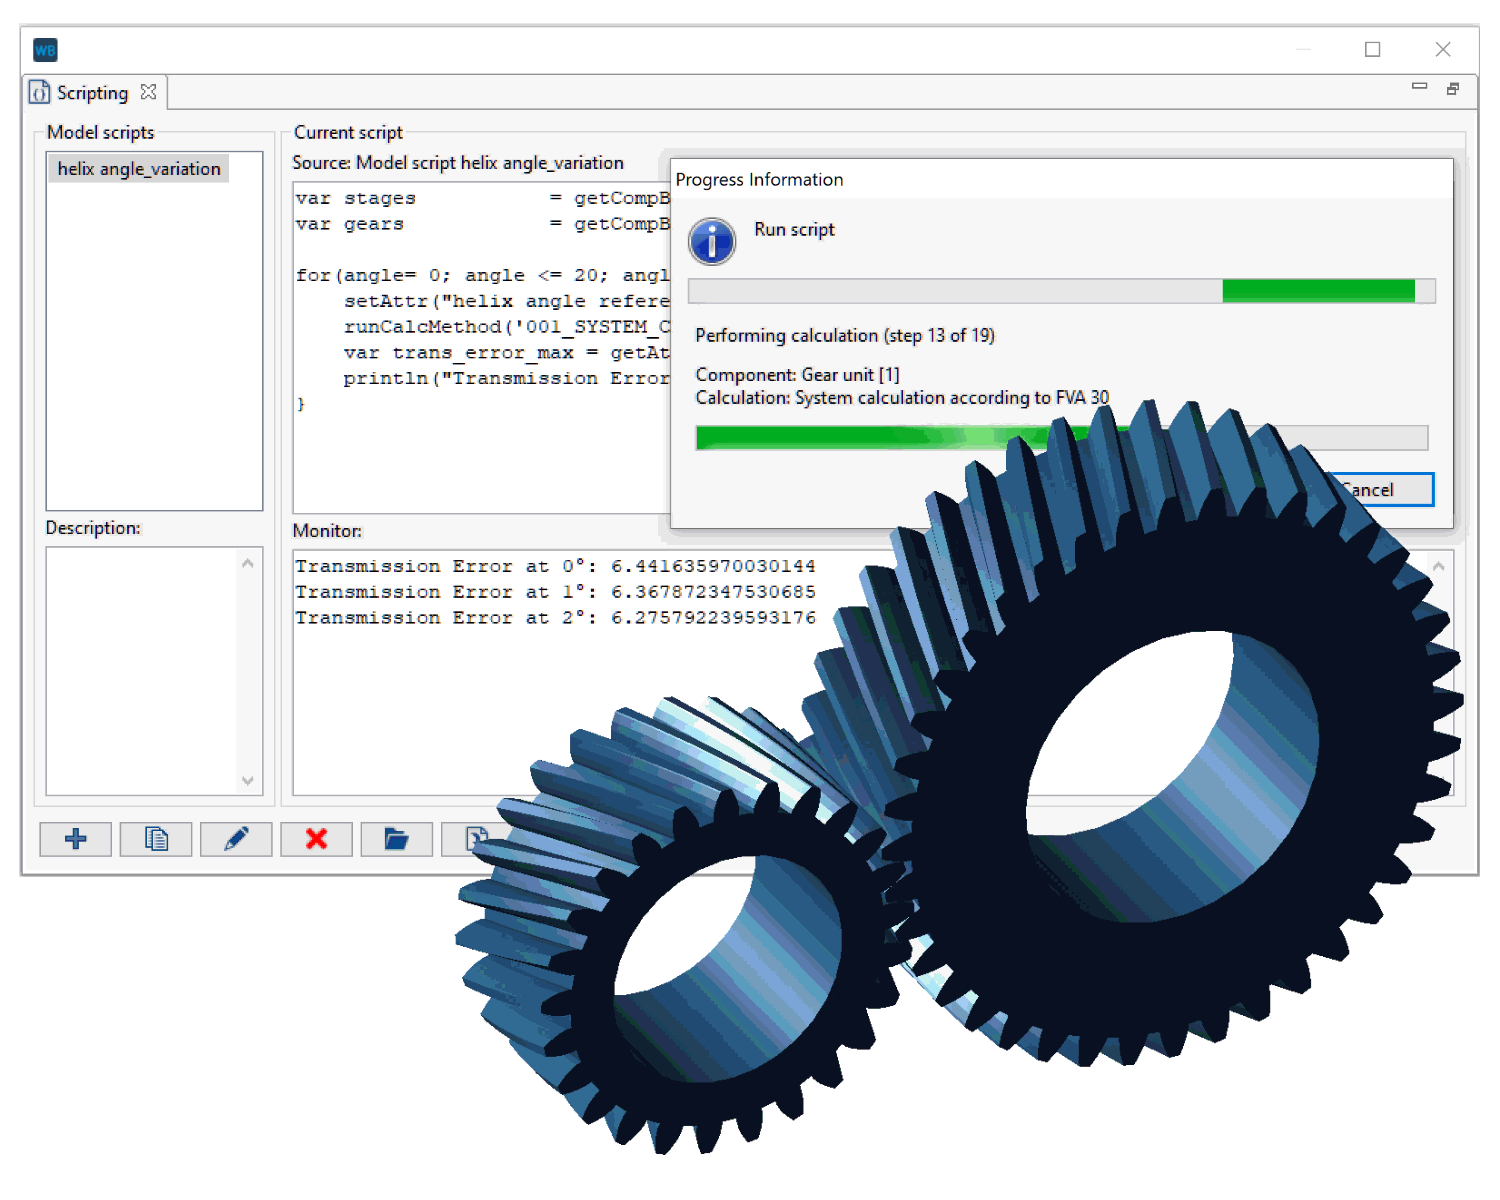 |
Running the script in the FVA-Workbench
1var gearUnitID = 1;
2var stageID = getCompByType("cylindrical_mesh")[0];
3var gearID = getCompByType("cylindrical_gear")[0];

4setAttr("gta_switch_deactivate_all_calculations", gearUnitID, true, EDAT);
5setAttr("gta_switch_3d_load_distribution_analytical", gearUnitID, true, EDAT);
6setAttr("gta_switch_3d_force_excitation", gearUnitID, true, EDAT);

7for(angle = 0; angle <= 20; angle++){
8    setAttr("helix angle reference diameter", gearID, angle, EDAT);
9    runCalcMethod("001_SYSTEM_CALCULATION", gearUnitID);
10    var trans_error_max = getAttr("result_transmission_error_maximum", stageID, RDAT);
11    println("Transmission Error at "+angle+"°: "+trans_error_max+" µm");
     }
Component ID of the gear unit | |
getCompByType("cylindrical_mesh") returns a list of all cylindrical gear stages in the model. [0] queries the first element in the list. stageID now contains the ID of the first cylindrical stage in the model. | |
getCompByType("cylindrical_gear") returns a list of all cylindrical gears in the model. [0] queries the first element in the list. gearID now contains the ID of the first cylindrical gear in the model. | |
Sets the switches for all additional system calculations to false. | |
Sets the system calculation switch for "load distribution (analytical)" for the gear unit to true. | |
Sets the system calculation switch for "gear mesh excitation" for the gear unit to true. | |
for loop that increases the run variable by 1 in each step. When angle = 20, the operation is terminated. | |
setAttr() sets the input value (EDAT) for the "helix angle reference diameter" geometry attribute for the cylindrical gear in the gear variable. | |
runCalcMethod("001_SYSTEM_CALCULATION", gearUnitID); runs a system calculation in each step of the loop. | |
In each step, the result value of the "maximum transmission error" attribute is written to the trans_error_max variable. | |
Outputs a compound string (text + angle + maximum transmission error) to the FVA-Workbench Scripting Monitor |
Read modification matrix from Excel
The following script reads the height, width coordinates and the modification matrix from an Excel file and writes these values into the corresponding attributes of a modification component in the FVA-Workbench model. The Excel script functions getValuesRow(), getValueColumn() and getValuesMatrix() are used to write the arrays and matrix from the Excel file to script variables.
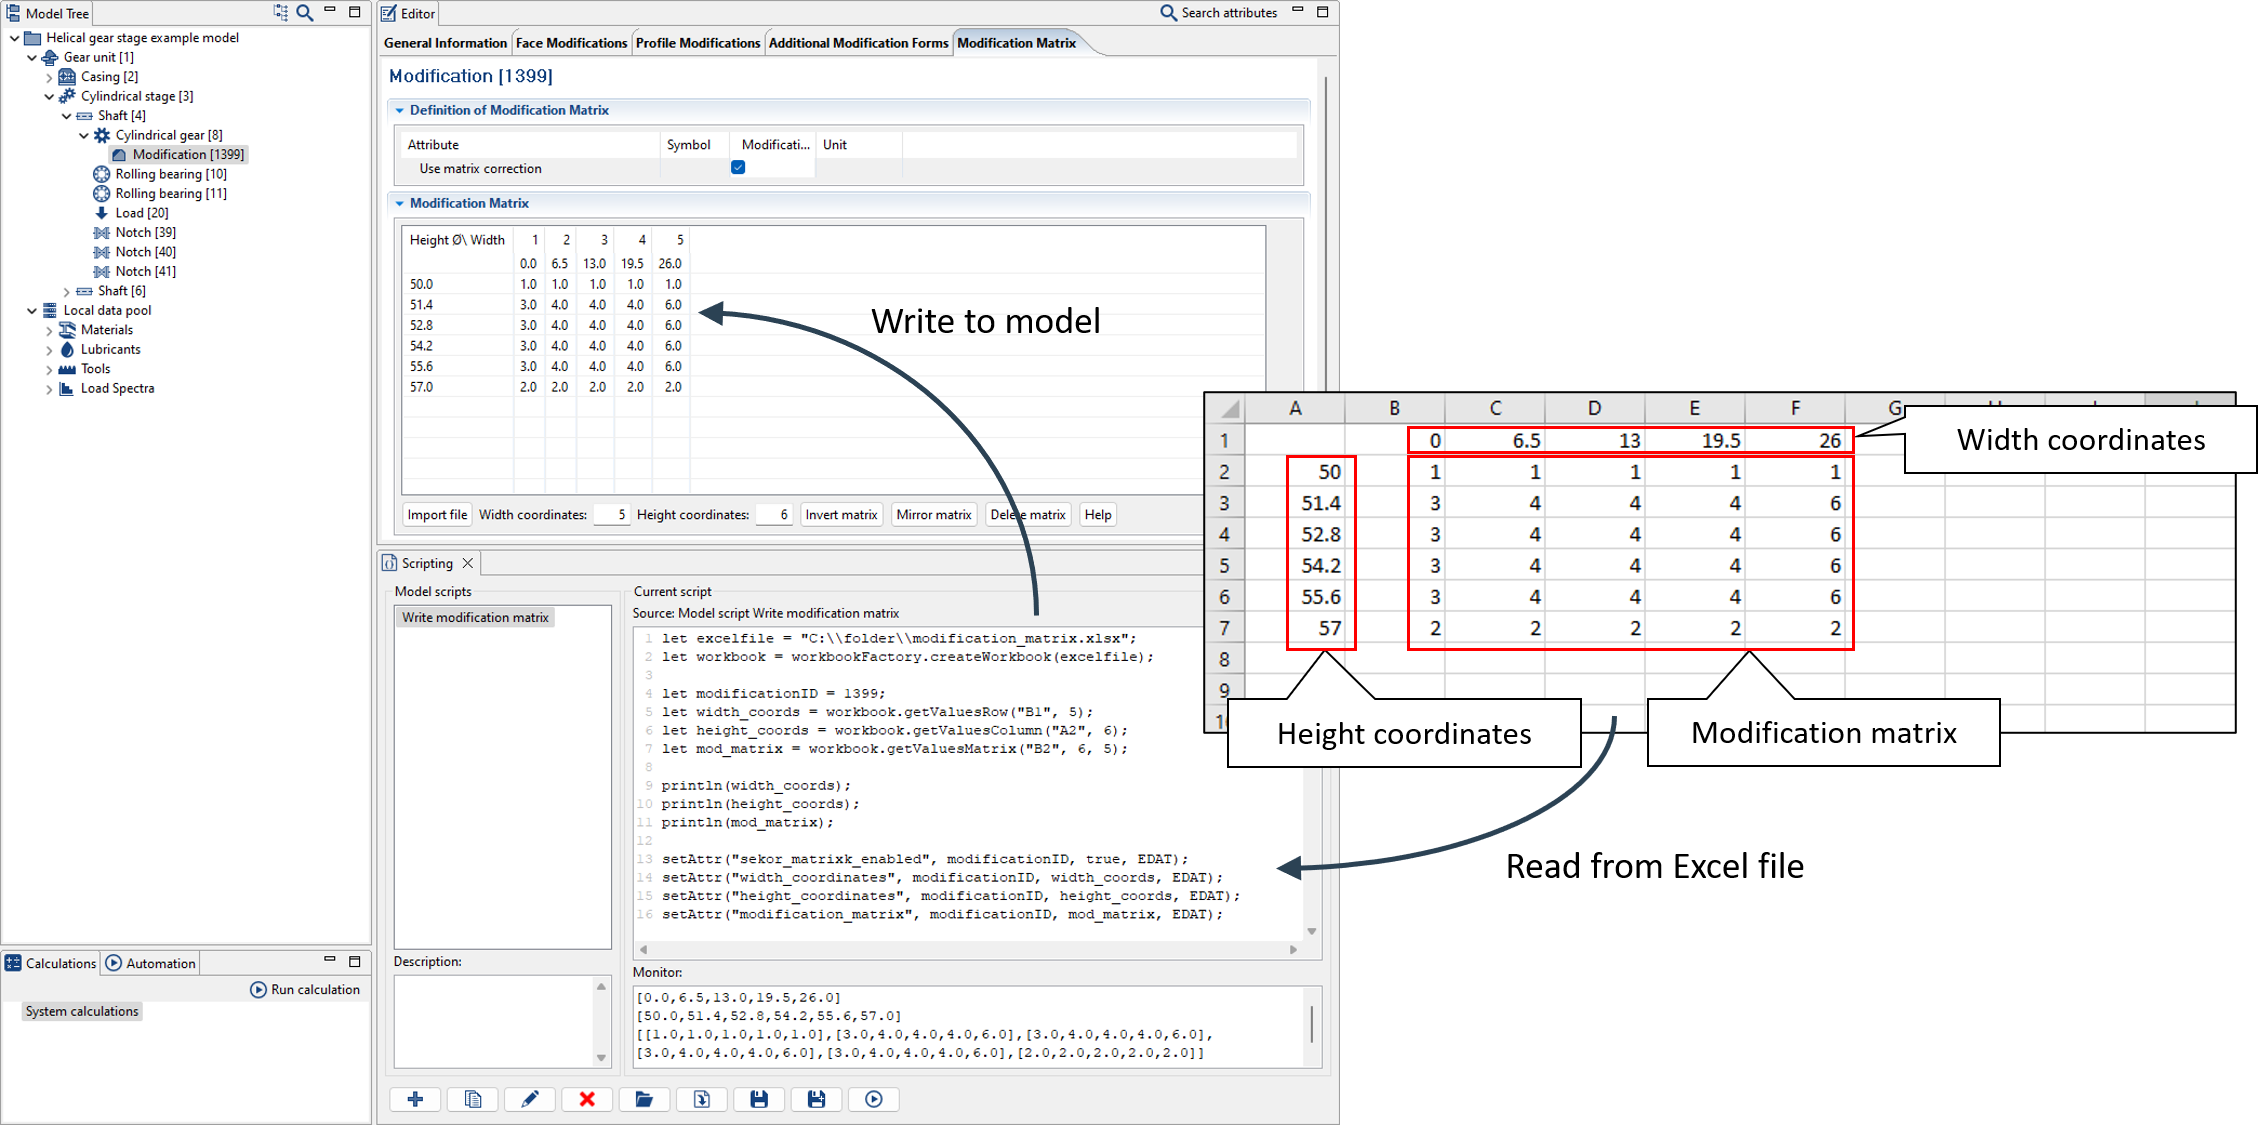
let excelfile = "C:\\folder\\modification_matrix.xlsx";
let workbook = workbookFactory.createWorkbook(excelfile);

let modificationID = 1399;
let width_coords = workbook.getValuesRow("B1", 5);
let height_coords = workbook.getValuesColumn("A2", 6);
let mod_matrix = workbook.getValuesMatrix("B2", 6, 5);

println(width_coords);
println(height_coords);
println(mod_matrix);

setAttr("sekor_matrixk_enabled", modificationID, true, EDAT);
setAttr("width_coordinates", modificationID, width_coords, EDAT);
setAttr("height_coordinates", modificationID, height_coords, EDAT);
setAttr("modification_matrix", modificationID, mod_matrix, EDAT);
Optimization: minimum face load factor
The following script determines the optimum amount for a helix angle modification so that the face load factor KHBeta is minimized.
In the FVA-Workbench, modifications are separate components that can be added. Multiple types of modifications (e.g., width and depth crowning) can be activated and configured for the modification component. In this case, the helix angle modification is activated. There is a checkbox for "consider helix angle modification" under the modification component in the FVA-Workbench. To activate this switch via scripting, the attribute "sekor_CHB_enabled" must be set to true.
Furthermore, the attribute "form of helix angle modification" is set to "at beginning of the face width (smaller u-coordinate)." To make this selection via scripting, the attribute "sekor_hcb_form" is set to the value "3."
For more information on "setting attribute values" see Data types
In order to run, this script requires a model that contains at least one cylindrical gear stage with a modification component added to at least one of the gears.
Part 1: Determine the direction of the modification
In the first step, the direction of the modification must be determined. Since "beginning of the face width" is selected as the form of the helix angle modification, the direction of the modification refers to Point A in the figure. In this case, the modification direction is left, and material will be removed from the left side. If the modification direction is right, material will be removed from the right side (Point B). If the direction is right, a positive value is specified for the modification. Correspondingly, if the modification direction is left, a negative value is specified.
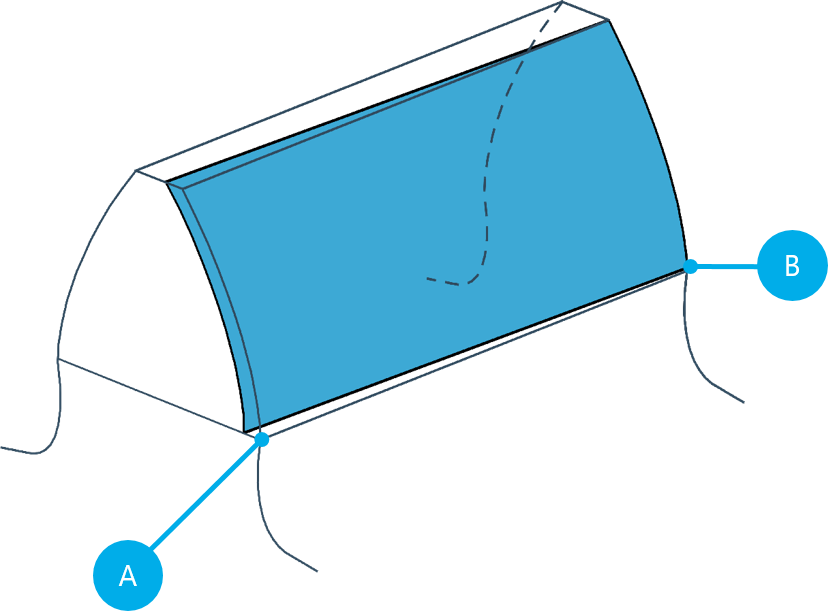 |
Example of modification with material being removed from the left side, e.g., +15µm starting from Point A, the beginning of the face width.
So that the following script can be used on any model, the component IDs are not specified as variables, but rather queried from the user while the script is running using the prompt() function.
The direction of the modification is determined as follows:
Calculation of KHBeta without modification
Calculation of KHBeta with a modification amount of +1µm
Calculation of KHBeta with a modification amount of -1µm
If the value of KHBeta with +1µm is greater than with -1µm the modification direction is right, otherwise it is left
1var stageID = prompt("Enter Cylindrical Stage ID");
2var gearID = prompt("Enter Cylindrical Gear ID");
3var modificationID = getSubComponents(gearID, "gear_correction")[0];
4var gearUnitID = 1;

5setAttr("sekor_CHB_enabled", modificationID, true, EDAT);
6setAttr("sekor_hcb_form", modificationID, "3", EDAT);

7setAttr("sekor_chb_bet", modificationID, 0, EDAT);
8runCalcMethod("001_SYSTEM_CALCULATION", gearUnitID);
9var khBetaNoMod = getAttr("gta_result_face_load_factor_flank", stageID, RDAT);
10println("KH_Beta unkorrigiert: " + khBetaNoMod);

11setAttr("sekor_chb_bet", modificationID, 1, EDAT);
12runCalcMethod("001_SYSTEM_CALCULATION", gearUnitID);
13var khBetaPosMod = getAttr("gta_result_face_load_factor_flank", stageID, RDAT);

14setAttr("sekor_chb_bet", modificationID, -1, EDAT);
15runCalcMethod("001_SYSTEM_CALCULATION", gearUnitID);
16khBetaNegMod = getAttr("gta_result_face_load_factor_flank", stageID, RDAT);

17if (khBetaPosMod > khBetaNegMod){
18    var direction = "right";
19}else {var direction = "left";} //kleine u-Koordinate

20println("Direction of modification: "+direction);
Writes the user-provided stage ID to the stageID variable. | |
Writes the user-provided gear ID to the gearID variable. | |
getSubComponents() queries all modification components on a cylindrical gear. [0] is used to write the ID of only the first modification to modificationID. | |
Assigns the ID of the gear unit to the gearUnitID variable. | |
Sets the attribute "consider helix angle modification" for the modification component to true. | |
Sets the value for the "form of helix angle modification" attribute to "3." | |
Sets the input value (EDAT) of the "amount of helix angle modification" attribute to 0 (µm). | |
Runs a system calculation. | |
Writes the result value (RDAT) of the "calculated flank face load factor" attribute of the cylindrical gear stage to khBetaNoMod. | |
Outputs the value for KHBeta (unmodified) to the Scripting Monitor. | |
Sets the input value (EDAT) of the "amount of helix angle modification" attribute to 1 (µm). | |
Runs a system calculation. | |
Writes the result value (RDAT) of the "calculated flank face load factor" attribute of the cylindrical gear stage to khBetaPosMod. | |
Sets the input value (EDAT) of the "amount of helix angle modification" attribute to -1 (µm). | |
Runs a system calculation | |
Writes the result value (RDAT) of the "calculated flank face load factor" attribute of the cylindrical stage to khBetaNegMod. | |
If khBetaPosMod is less than khBetaNegMod: | |
Assigns the string "right" to the direction variable. | |
Otherwise, assigns the string "left" to the direction variable. | |
Outputs the modification direction to the Scripting Monitor. |
Part 2: Iterative determination of the optimum correction amount
One result of the system calculation is a 2D proposed modification for uniform load distribution. The modification amounts for multiple supporting points across the face width are saved in an array attribute (correction_proposal_system_calculation). The goal of the optimization in this script is that the difference between the first (1) and last (2) points in the array should be less than 1.
The procedure is as follows:
The current modification value is saved to a variable.
The difference between the first and last points of the array is determined.
The difference is added or subtracted from the current modification amount, depending on the direction of the modification
A system calculation is performed with the new modification value.
The difference is determined once again. If the difference is less than 1, the script is terminated.
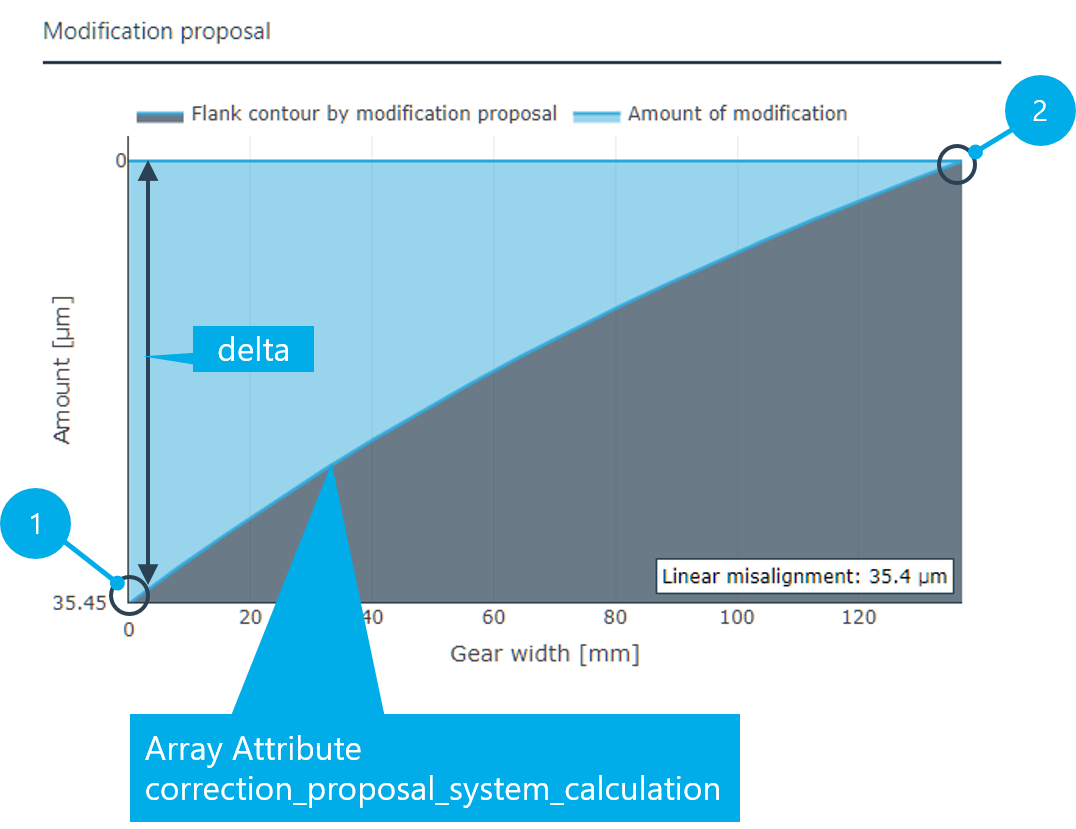 |
The proposed modification calculation result can be queried via the attribute correction_proposal_system_calculation.
1do {
2   runCalcMethod("001_SYSTEM_CALCULATION", gearUnitID);
3   var helixAngleModAmount = getAttr("sekor_chb_bet", modificationID, RDAT);
4   var correctionProposal = getAttr("correction_proposal_system_calculation", stageID, RDAT);

5   var delta = correctionProposal[0] - correctionProposal[correctionProposal.length-1];
6   if (direction == "left"){
7       var newHelixAngleModAmount = helixAngleModAmount + delta;
8   }else{  newHelixAngleModAmount = helixAngleModAmount - delta;}

9   setAttr("sekor_chb_bet", modificationID, newHelixAngleModAmount, EDAT);
10   println("Modification Amount: "+newHelixAngleModAmount+" mym"+" -> delta: "+ delta);
11}while(delta < 1);

12runCalcMethod("001_SYSTEM_CALCULATION", gearUnitID);
13var finalKhBeta = getAttr("gta_result_face_load_factor_flank", stageID, RDAT);
14println("Final KH_Beta: "+finalKhBeta);
Starts the do-while loop. | |
Starts a system calculation. | |
Writes the result value (RDAT) of the "helix angle modification amount" attribute to the helixAngleModAmount variable. | |
Writes the result value of the "proposed modification from system calculation" array attribute to the correctionProposal variable. | |
Subtracts the last value in the correctionProposal array from the first value and writes it to the delta variable. | |
If the modification direction is left: | |
Adds the difference to the helixAngleModAmount variable and writes the value to newHelixAngleModAmount. | |
Otherwise: subtracts the difference from the helixAngleModAmount variable and writes the value to newHelixAngleModAmount. | |
Sets the input value (EDAT) of the "amount of helix angle modification" attribute to newHelixAngleModAmount. | |
Outputs the new modification amount + difference to the Scripting Monitor. | |
Repeats the do-while loop until the difference is less than 1. | |
Performs a system calculation with the final modification amount after the loop is completed. | |
Outputs the final KHBeta value to the Scripting Monitor. |
Outputting formatted text to a file
The following script creates a text file that includes the formatted name, symbol, value, and unit for multiple attributes. The format() function is used for the formatting. The writeToFile()function is used to output to the file.
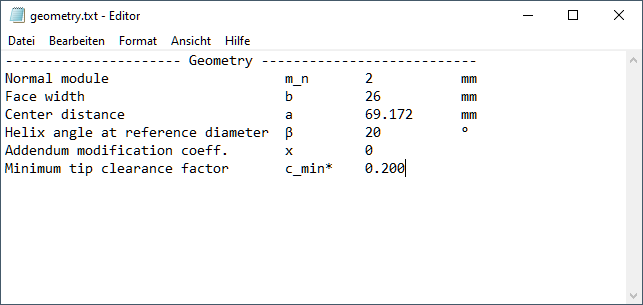
Output file of the script
Part 1: formatAttr() function
In this script, the formatAttr() function is declared with the parameters attributeID compID and dat. The function is then called for each attribute that should be included in the output file. The return value of the function is a string with "Attribute_name Symbol Value Unit."
1function formatAttr(attributeID, compID, DAT) {
2   let name = getAttrProperty(attributeID, compID , 'NAME');
3   let symbol = getAttrProperty(attributeID, compID , 'SYMBOL');
4   let value = getAttr(attributeID, compID, DAT)+0.0;
5   let unit = getAttrProperty(attributeID, compID , 'UNIT_NAME');

6   let format_name   = format("%-35s", name);
7   let format_symbol = format("%-10s",  symbol);
8   let format_value;
9   let valueType = typeof value;

10  if(valueType == "number" && value %1 == 0){
11	 valueType = "int";
       }
12  switch (valueType) {
13     case "number": format_value = format("%-12.3f", value); break;
14     case "int":    format_value = format("%-12.0f", value); break;
15     case "string": format_value = format("%-12s", value); break;
16     default:       format_value = format("%-12s", "Error"); break;
       }
17  let format_unit = format("%-3s", unit);
18  let resultstring = format_name + format_symbol + format_value + format_unit +"\n";
19  return resultstring;
}
Declares the function formatAttr() with the parameters Attribute ID, Component ID, and DAT (see Data integrity (EDAT/RDAT)). | |
Queries the name of the attribute and writes it to the name variable. | |
Queries the symbol of the attribute and writes it to the symbol variable. | |
Queries the input value (EDAT) or result value (RDAT) of the attribute and writes it to the value variable (+0.0 is used for compatibility purposes). | |
Queries the unit of the attribute and writes it to the unit variable. | |
Formats the contents of the name (left-justified, 35 characters wide) and writes the result to the format_name variable. | |
Formats the contents of the symbol (left-justified, 10 characters wide) and writes the result to the format_symbol variable. | |
Declares a new format_value variable. | |
typeof returns the data type ("string" or "number"). | |
Distinction: if the value of the data type is "number" and the division with remainder = 0: | |
the variable valueType is set to "int" | |
switch statements to evaluate the variable valueType. | |
If valueType = "number" then it is formatted left-justified with a width of 12 characters and 3 decimal places. | |
If valueType = "int" then it is formatted left-justified with a width of 12 characters and 0 decimal places. | |
If valueType = "string" it is formatted left-justified with a width of 12 characters. | |
In all other cases, "Error" is output (e.g., if the data type of the queried attribute is "array"). | |
Formats the contents of the unit (left-justified, 3 characters wide) and writes the result to the format_unit variable. | |
Merges all format_ variables into a string, adds a line break at the end, and writes everything to the resultstring variable. | |
resultstring is returned to the caller as the result of the function. |
Part 2: writing the output file
To write the output file, the formatAttr() function declared above is called for each attribute. The return value of the function is then written to the specified file via writeToFile().
1let filepath = "C:\\geometry.txt";
2let stageID = 3;
3let gearID = 8;

4writeToFile(filepath, "---------------------- Geometry ---------------------------\n", "c", "UTF-8");
5writeToFile(filepath, formatAttr("normal module", gearID, EDAT), "a", "UTF-8");
6writeToFile(filepath, formatAttr("face width", gearID), "a", "UTF-8", EDAT);
7writeToFile(filepath, formatAttr("center_distance_editor", stageID, RDAT), "a", "UTF-8");
8writeToFile(filepath, formatAttr("helix angle reference diameter", gearID, EDAT), "a", "UTF-8");
9writeToFile(filepath, formatAttr("addendum modification coefficient", gearID, EDAT), "a", "UTF-8");
10writeToFile(filepath, formatAttr("minimum_tip_clearance_factor", gearID, EDAT), "a", "UTF-8");
Path and file name of the output file | |
ID of a cylindrical gear stage | |
ID of a cylindrical gear | |
Writes a header to the output file. "c" creates a new file, "UTF-8" specifies the encoding. | |
Calls formatAttr() for the normal module attribute (input value -> EDAT) of the cylindrical gear component. The return value is written to the file. "a" adds the string to the existing file. | |
Writes the string for the face width attribute to the file. | |
Writes the string for the center distance attribute to the file. | |
Writes the string for the helix angle attribute to the file. | |
Writes the string for the addendum modification coefficient attribute to the file. | |
Writes the string for the minimum bottom clearance factor attribute to the file. |
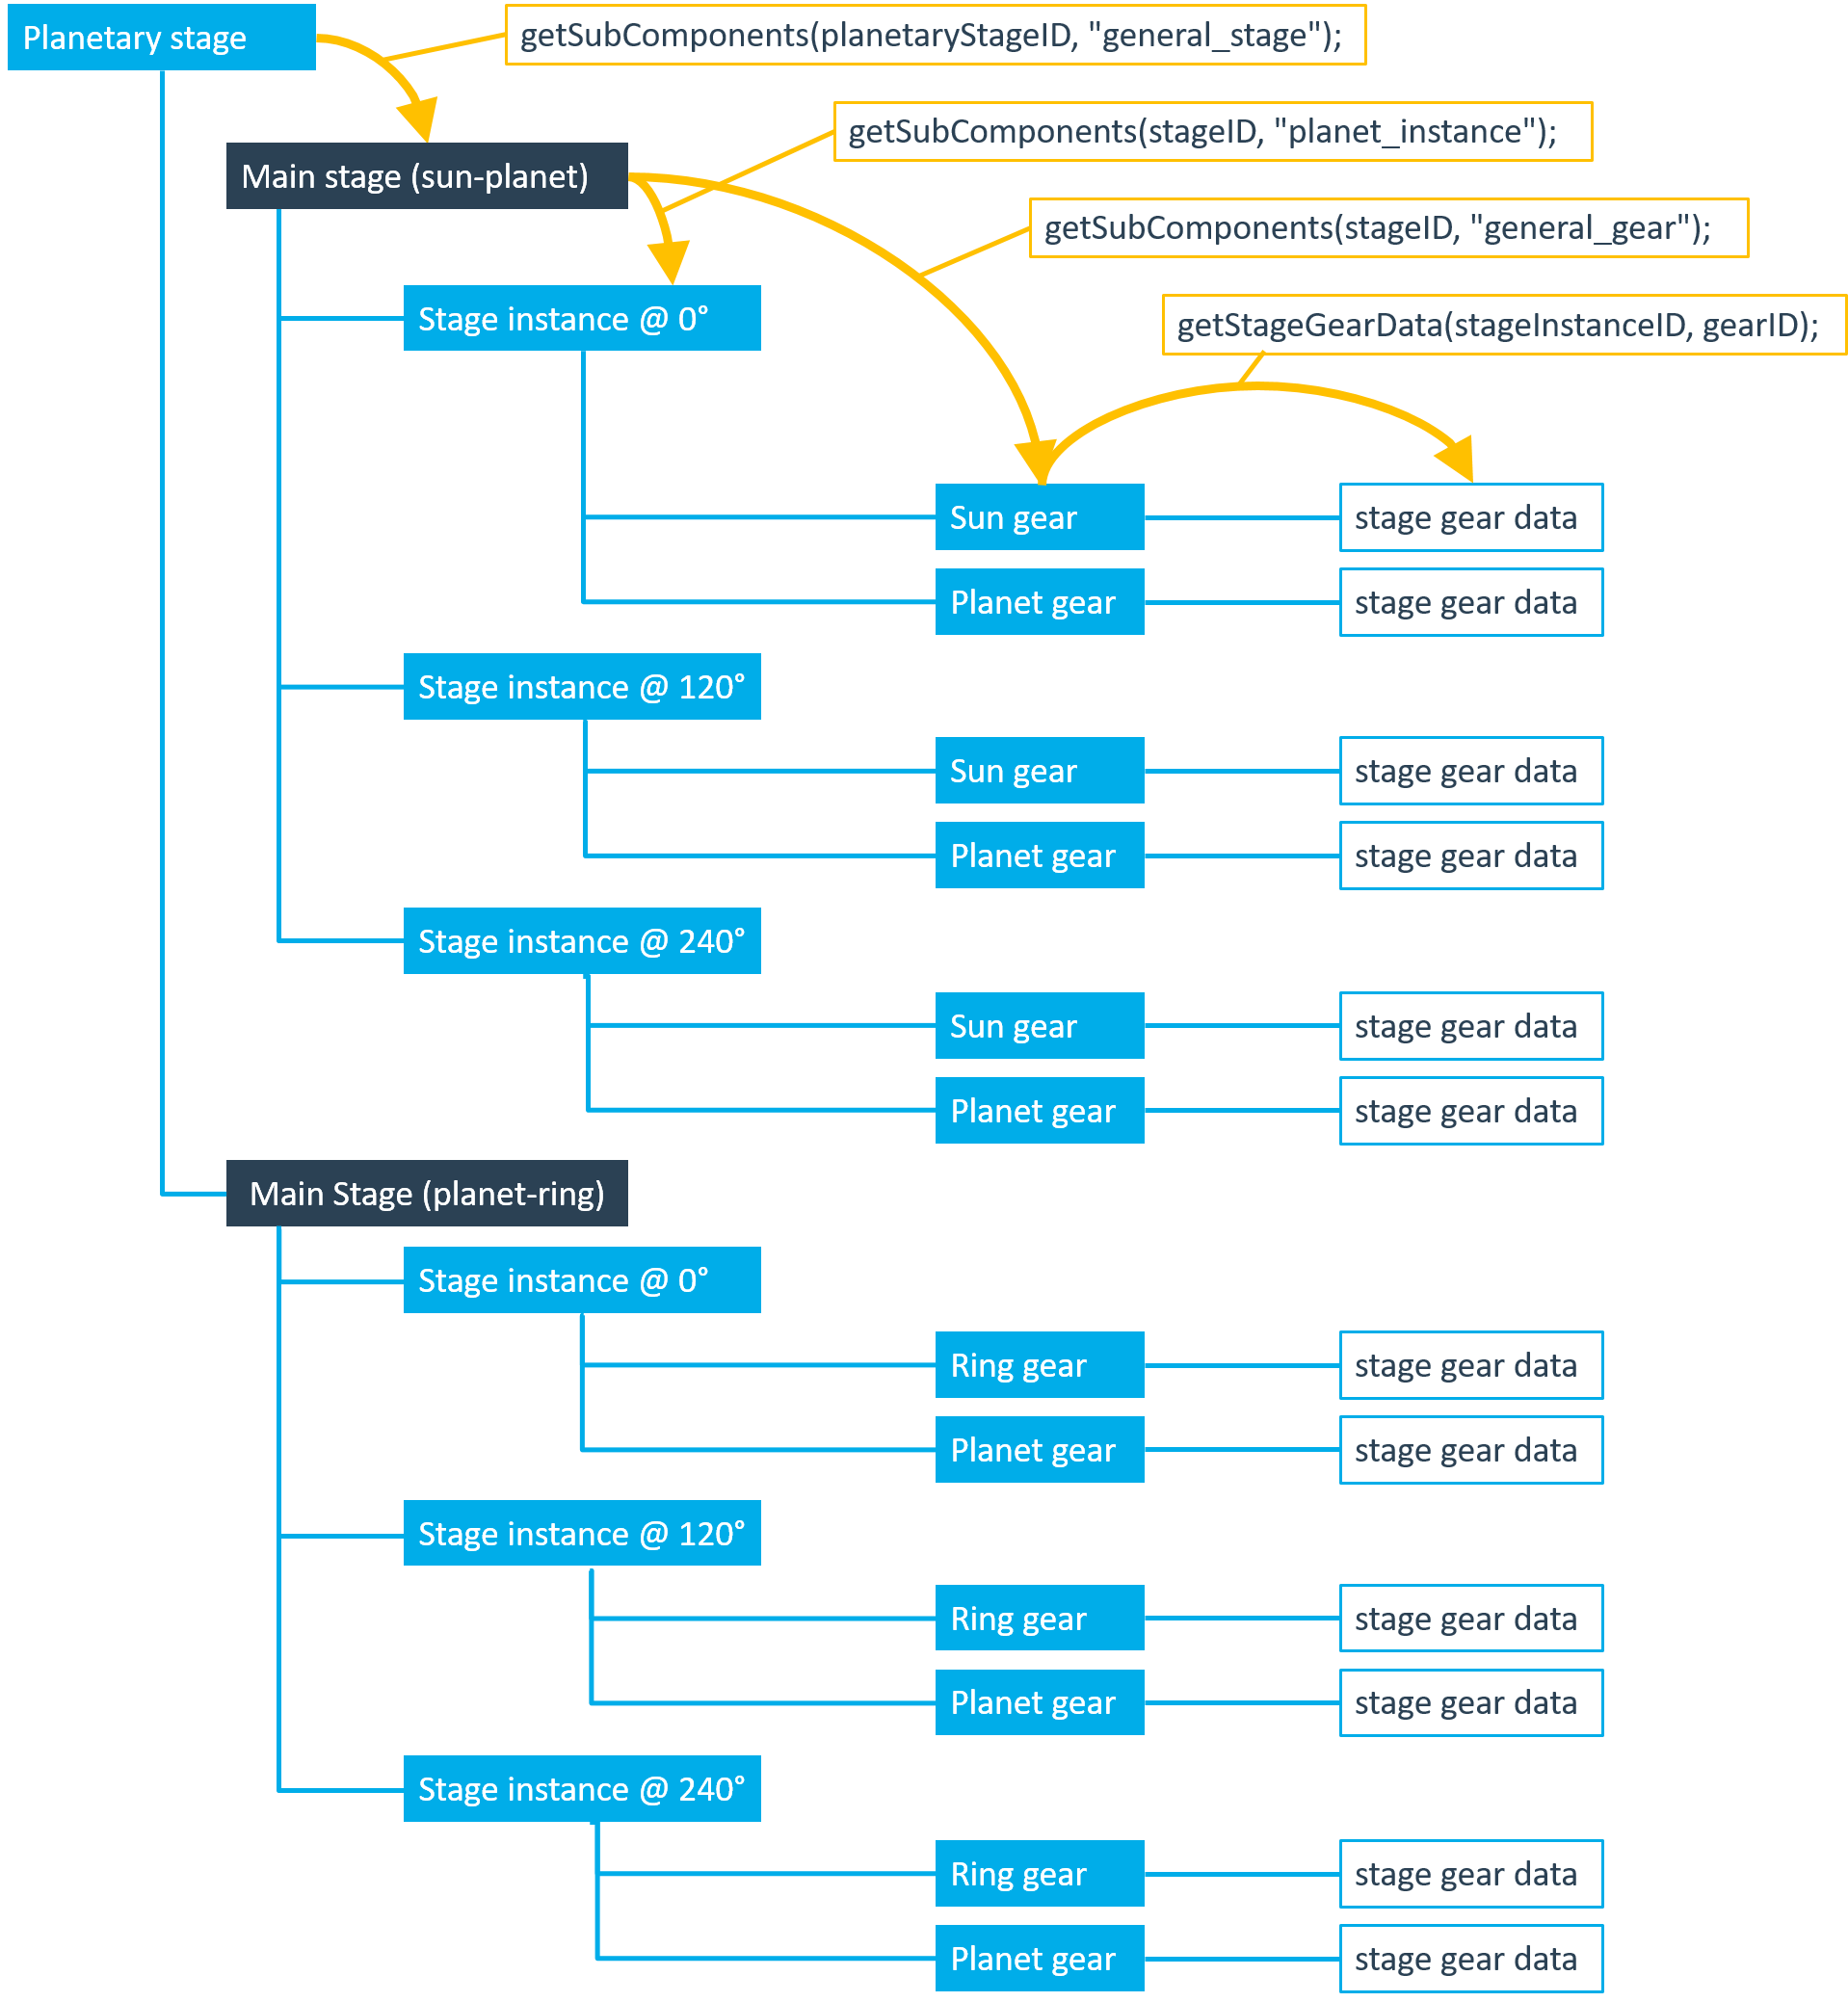
Querying results in planetary stages
The following script queries the maximum tooth root stress for each individual mesh in a planetary stage and outputs the results in a tree structure on the Scripting Monitor.

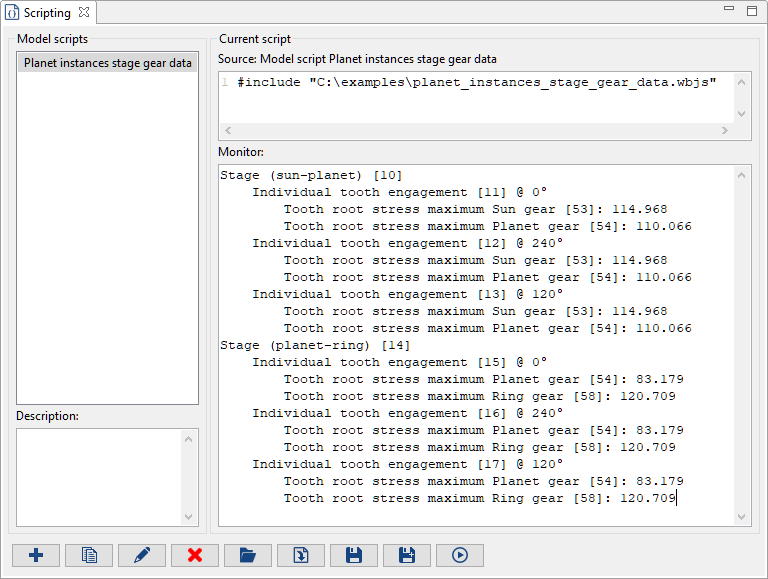
Only two cylindrical gear stages are shown in the FVA-Workbench model tree for the planetary gear shown above: the planet-ring gear and planet-sun meshes. These 2 parent stages include all of the input data, it is not necessary to show all 6 gear meshes. However, the calculation results may differ for each of the individual gear meshes (1-6 in the figure above). Therefore, each of the 2 parent stages has 3 instance components for the individual stages. Access to the result attributes of these instance components is shown in the following script.
Output of the script on the Scripting Monitor.
let planetaryStageID = 9;
let stageIDs = getSubComponents(planetaryStageID, "general_stage");

for (let i = 0; i < stageIDs.length; i++){
    let stageInstanceIDs = getSubComponents(stageIDs[i], "planet_instance");
    let gearsInStageIDs =  getSubComponents(stageIDs[i], "general_gear");
	println(getCompProperty(stageIDs[i], "NAME"));

	for (let i = 0; i < stageInstanceIDs.length; i++){
		let planetAngle = getAttr("polar_angle_of_planet_instance", stageInstanceIDs[i], EDAT);
		println("\tIndividual tooth engagement ["+stageInstanceIDs[i]+"] @ "+planetAngle+"°");
		let stageGearDataID1 = getStageGearData(stageInstanceIDs[i], gearsInStageIDs[0]);
		let stageGearDataID2 = getStageGearData(stageInstanceIDs[i], gearsInStageIDs[1]);
		let toothRootStressGear1 = getAttr("result_tooth_root_stress_compression_maximum", stageGearDataID1, RDAT);
		let toothRootStressGear2 = getAttr("result_tooth_root_stress_compression_maximum", stageGearDataID2, RDAT);

		println("\t\tTooth root stress maximum "+getCompProperty(gearsInStageIDs[0], "NAME")+": "
		+toothRootStressGear1);
		println("\t\tTooth root stress maximum "+getCompProperty(gearsInStageIDs[1], "NAME")+": "
		+toothRootStressGear2);
	}
}
Reading and writing XML files
The following example shows how XML files can be read in, modified and written out.
For more information see: ECMAScript for XML (E4x) specification
Example XML file (people.xml)
<people>
   <person gender="male">
      <name>John Doe</name>
      <hair>Brown</hair>
      <eyes>Blue</eyes>
      <height measure="metric">176</height>
   </person>
   <person gender="female">
      <name>Jane Doe</name>
      <hair>Black</hair>
      <eyes>Grey</eyes>
      <height measure="imperial">5'7</height>
   </person>
</people>
Example script
1let xmlString =readFileAsString("C:/people.xml");
2xmlString = xmlString.replace(/<\?xml[^>]*\?>/, "");
3var xml = new XML(xmlString);

4println(xml.person[0].name);
5println(xml.person[0].@gender);

6xml.person[0].name = "Matthias";
7println(xml.person[0].name);

8xml.person[0]["nationality"] = "German";
9xml.person[0].@["title"] = "Mr";
10xml.person[1].@["title"] = "Mrs";

11writeToFile("C:/people.xml", xml, "c", "UTF-8");
Reads an XML file as a string | |
Removes potentially problematic characters from the string | |
Converts the string into an XML object | |
Prints the name (element) of the first person on the scripting console | |
Outputs the gender (attribute) of the first person on the scripting console | |
Changes the name of the first person | |
Prints the name again on the scripting console | |
Adds a new element (nationality) and sets the value to "German" | |
Adds a new attribute (title) to the first element person and sets the value to "Mr" | |
Adds a new attribute (title) to the second element person and sets the value to "Mrs" | |
Writes the modified XML back to the people.xml file |
Reading and writing JSON files
The following example shows how JSON files can be read in, modified and written out.
Notice
If a JSON element (property) contains a minus sign in its name e.g. {"hair-color": "black"} square brackets must be used instead of dot notation to access it. So jsonObj["hair-color"] instead of jsonObj.hair-color.
Example JSON file (people.json)
[
  {
    "gender": "male",
    "name": "John Doe",
    "hair": "Brown",
    "eyes": "Blue",
    "height": {
      "measure": "metric",
      "value": "176"
    }
  },
  {
    "gender": "female",
    "name": "Jane Doe",
    "hair": "Black",
    "eyes": "Grey",
    "height": {
      "measure": "imperial",
      "value": "5'7"
    }
  }
]
Example script
1let jsonString =readFileAsString("C:/people.json");
2let json = JSON.parse(jsonString);

3println(json[0].name);
4println(json[0].gender);

5json[0].name = "Matthias";
6println(json[0].name);

7json[0]["nationality"] = "German";
8json[0]["title"] = "Mr";
9json[1]["title"] = "Mrs";
10let jsonStringifyed = JSON.stringify(json, null, 2);

11writeToFile("C:/people.json", jsonStringifyed, "c", "UTF-8");
Reads an JSON file as a string | |
Converts the string into an JSON object | |
Prints the name of the first person on the scripting console | |
Outputs the gender of the first person on the scripting console | |
Changes the name of the first person | |
Prints the name again on the scripting console | |
Adds a new property (nationality) and sets the value to "German" | |
Adds a new property to the first person and sets the value to "Mr" | |
Adds a new property to the second person and sets the value to "Mrs" | |
Convert the JSON object to a string (2 spaces are used for indentation) | |
Writes the modified JSON back to the people.xml file |